Flutter Tutorials – #1.1 – First App – Simple WebView
Introduction
Welcome to Himdeve development, where we are preparing the best tutorials to make your mobile app development easier and more efficient.
Motivation
Flutter allows you to create applications in one language (Dart) and generate them for both Android and iOS environments. These applications are very fast compared to other frameworks and, from a visual point of view, incredibly nice. It is really a framework for creating stylish designed applications, because it contains a set of components that are directly available and allow simple yet extremely effective use. Flutter, as well as Dart, are directly covered by GOOGLE. Flutter also allows creating web and desktop applications, but our focus is currently on mobile development.
Goal
In this first part of our Flutter series of tutorials, we will focus on creating a WebView for any website available on the internet and running (embedding) it in our own application.
Caution
In this first application, we will use the easiest way to create a WebView application. This means that please do not expect any extra advanced programming techniques right away. However, we will further modify the application in the following sections and add other interesting functionality.
Requirements
This tutorial is built in a way that counts on at least some knowledge of object-oriented programming. Also, the basic Dart syntax is not discussed here.
Procedure
In this tutorial we will use VS Code (Visual Studio Code).
After running VS Code, run terminal (WIN: ctrl + shift + y / MAC: cmd + shift + y) and write the following command to create a project with defined package name and project name. This command strictly limits the use of lowercase letters and avoids spaces. It also creates a Swift project for iOS, Kotlin project for Android.
Then we open the project.
Dependencies
The pubspec.yaml file is used to define the dependencies we need for our project.
In this case, we need dependencies for the WebView package:
At this time, the latest version of the WebView package is 0.3.18 + 1
- +1 -> means a change from the previous version that does not affect the Public API.
- ^0.3.18 -> means 0.3.x version, where x >= 18. If the version is hard-coded: ‘0.3.18‘, then only that particular version works.
- For versions that are in pre-release status, they are ignored when the ‘flutter packages get’ command is called to install the packages. If we don’t want to ignore them, but use them, then a ‘-‘ sign and their name is added at the end. For example: ^1.2.3-beta.
As mentioned above, to install these dependencies, you need to write a ‘flutter packages get’ command to the terminal or, in our case, just save the file (WIN: ctrl + s / MAC: cmd + s).
Path to the pubspec.yaml file: project_name -> pubspec.yaml
Project structure
Next we are interested in these 3 folders: lib, android, ios.
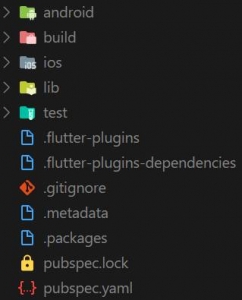
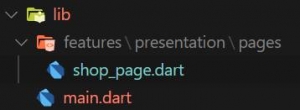
Especially the ‘lib‘ folder where our entire Flutter project is created.
The Android version of our Flutter project is generated in the ‘android‘ folder and the iOS version in the ‘ios‘ folder.
Sometimes we will have to modify each generated version for Android or iOS, to run properly on their platforms.
In this case, for WebView, the following settings need to be added.
Android Settings
- For Android to be able to open WebView web pages that do not have an SSL certificate, that is, do not have HTTPS encrypted hypertext transfer protocol but only transmit data via simple text communication over HTTP, you must set cleartext transfer to ‘true‘ in AndroidManifest.xml from Android version 9 (API level 28).
- Path to the AndroidManifest.xml file: project_name -> android -> app -> src -> main -> AndroidManifest.xml
iOS Settings
- In order to run WebView on iOS platform it is necessary to enable embedded views in Info.plist, in this case the WebViews.
- Path to the Info.plist file: project_name -> ios -> Runner -> Info.plist
- As for the iOS, you also need to enable the launch of websites in WebView that do not have an SSL certificate, by adding ‘NSAppTransportSecurity‘ key to Info.plist.
However, I do not recommend adding these settings, especially for iOS, because if you set the key’s value to TRUE, you must supply a justification during App Store review. This, of course, makes it unnecessarily difficult for a delivery of the application to your customer.
main.dart
By default, there is a ‘main.dart‘ file in the Flutter ‘lib’ folder. This file is our app entry file and the ‘void main ()’ method is our entry-point for entire Flutter app.
The code looks like this:
In this case, what we want to do is run the application. This is done by the ‘runApp‘ method. It has a widget as a parameter.
At this point, it is good to say that all UIs in Flutter are a widget. Whatever component you create, it’s actually a widget. And every widget is of course a representation of some class in Dart. In fact, each widget is created using the Flutter Render Tree, which is a certain low-level rendering system based on a tree of objects that are inherited from RenderObject. However, most programmers will not directly interact with this rendering tree, but will instead use widgets that are created using this rendering tree.
In this case, our first widget is StatelessWidget, which has a built-in ‘build‘ method that returns a tree or a hierarchy of other widgets.
Flutter works more like a game engine. The user interface is built and rendered on a canvas (Skia canvas) as it changes using the ‘build()‘ widget method. Flutter updates the user interface at 60 frames per second (fps), or 120 fps on devices capable of 120Hz updates.
In our case, we are going to render the ‘MaterialApp‘ widget first. Material is a visual design language that is standard for mobiles and web. Flutter offers a rich set of widgets for material design. Of course, you can also use the ‘CupertinoApp’ widget, which represents the Cupertino design of iOS apps, and it is also possible to combine both designs together.
Next, we define the app name, set a theme, and define the ‘home‘ attribute that represents another widget in this widget hierarchy. In our case, ‘ShopPage‘.
shop_page.dart
This class, or this ‘ShopPage‘ widget, has a constructor and build method that returns another widget and that is WebView.
WebView
We imported the WebView widget from the ‘webview_flutter‘ dependency package that we defined in the pubspec.yaml file.
WebView has several attributes, but in this first example we focus only on 2 – javascriptMode and initialUrl.
InitialUrl defines the url of the web page we want to display, and JavascriptMode.unrestricted allows JavaScript to run in WebView.
Conclusion
This completes our first application and you can of course find the source code on the githube.
Finally, I would like to mention the amazing tutorials you can find on the site: flutter.education, created by Matej Rešetár from @resocoder.