Flutter Tutorial – #1.3 – WebView – Navigation Controls, Javascript communication
Introduction
Welcome to Himdeve development, where we are preparing the best tutorials to make your mobile application development easier and more efficient.
Goal
- We add navigation buttons – go back and forward in your browsing history and refresh button to reload the page.
- In addition, we will learn how to communicate directly with the javascript page loaded in WebView, how to write and call javascript for WebView from Flutter.
Procedure
First we open our existing application from the previous tutorial and we open the file shop_page.dart.
We want to add 3 buttons to the top bar of our existing app:
- To go back in the browsing history
- Refresh button
- To go forward in the browsing history
So let’s move on to the code section where we create the Scaffold widget, especially its top bar – AppBar.
We’ll add a new attribute actions here with the navigation controls. Since everything in Flutter is a widget, we can create navigation buttons in the new NavigationControls class that will inherit from the Stateless Widget and we insert the instance of that class as the value of the attribute actions. The parameter of this class will be the Future WebViewController object.
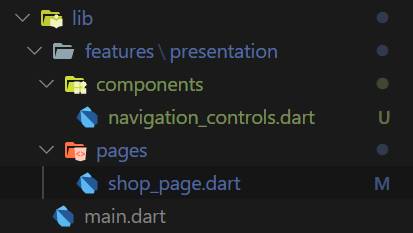
Then, in our project structure, under the presentation layer, we create the components folder and in it a new file navigation_controls.dart.
Navigation Controls
We open the newly created navigation_controls.dart file.
And we will create the NavigationControls class. The constructor of this class will have the Future object of the WebViewController as an argument.
Subsequently, in the build method of the Stateless Widget, we will create the FutureBuilder widget as in the previous tutorial, where future will be our input parameter for this class. Future generates info about whether WebView Controller is valid.
Consequently, if the WebView Controller is valid, that is, controller.hasData is true, we will return the Row widget in the build method. The Row widget is a Flutter component that displays its children, means other widgets in this widget hierarchy, in a horizontal box.
What’s good to realize is that the Row widget is not scrollable. Even having more widget-descendants in a Row widget than the available space for this widget, is generally considered an error. In that case, it would be a good idea to use the Flutter ListView widget and set the scroll direction horizontally using the ListView attribute scrollDirection (scrollDirection: Axis.horizontal).
Our Row widget will have 3 additional widgets in its widget hierarchy that will represent the 3 navigation buttons mentioned in the first goal of this tutorial.
To go back in the browsing history
The first button in our navigation field will be: To go back in the browsing history. To do this, we create the _buildHistoryBackBtn method, which returns the FlatButton widget. This method has the BuildContext and Snapshot of the WebViewController as the parameters.
In this case, we want this button to consist of an icon representing the back arrow and the text with the title ‘back‘. Therefore, we add the horizontal Row widget to the child attribute of this button to insert the icon and text.
In OnPressed method of this button, it means on the interaction of clicking to this button, we will ask WebViewController if it has data to go backward in its browsing history.
And if it does, we call the WebViewController method:
If it doesn’t, we’ll display a Snackbar with the information that there is no backward browsing history.
Note again that WebViewController’s method – controller.data.canGoBack() needs to be awaited, it means it needs to wait until the Future value, returned by this call, is resolved.
To go forward in the browsing history
This method looks almost the same as the method representing going backwards in history. Just the text and icon of the button as well as the info about that there is no forward browsing history will change. And also the WebViewController methods – canGoForward() and goForward() are used. The name of this method is _buildHistoryForwardBtn.
Refresh button
For the refresh button we create the method _buildReloadBtn, which will have only one input parameter, which is a SnapShot of the WebViewController.
This method returns an IconButton widget which has a refresh icon for the button as well as onPressed attribute representing a callback method to reload the page in WebView using the WebViewController method:
Then we return to the shop_page.dart file to import the NavigationControls class.
Navigation Delegate
In the _ShopPageState class, in the _buildWebView method for the WebView widget, we set the navigationDelegate attribute, which returns a callback method representing the navigation request of a web page change in WebView.
To make this request, we will create a _buildNavigationDecision function that represents an example of how you can manage a web page change request directly in Flutter.
In our case, we will give an example when a user clicks on /my-account sub-page in our store, where we disable this request in Flutter and we display a Snackbar informing that the user does not have the rights to view this sub-page.
Global Key
What is interesting to note here is that to show a SnackBar cannot be done classically via Scaffold.of(context).showSnackBar, which would find the nearest ancestor of Scaffold in this widget hierarchy. Because we would get an exception that Scaffold.of was called with a context that doesn’t contain Scaffold. And that is because we would try to use the context of widget that created the instance of Scaffold, not its child. Scaffold.of(context) only works if we have a context of widget-child in this widget hierarchy under the Scaffold.
Therefore, we will use a different approach by defining the GlobalKey for Scaffold. And then we can use the globalKey.currentState.showSnackBar command to display the desired SnackBar.
Javascript communication
To illustrate how communication between a javascript page loaded in WebView and Flutter works, we define another onPageFinished attribute in the WebView widget. It is again a WebView callback method that is called when the page is fully loaded in WebView.
And our goal will then be to rewrite the title bar at the top of our application based on the title of the page we just loaded.
This information can be found using the javascript command:
So our task is to call this javascript command using the code in Flutter and then respond to its result of the name of the current displayed page in Flutter and use it for the top bar of our screen.
We create the _showPageTitle method, which we call when the page is fully loaded in WebView. Here we call the webViewController.evaluateJavascript method to evaluate the javascript expression. In our case, document.title.
And in order to process this result, that is, the page title in Flutter, we must use a class from the WebView package called JavascriptChannel.
Before we jump into JavascriptChannel, let’s first look at how we even got WebViewController in the _showPageTitle method.
Future – Then method
First we have to evaluate our WebViewController encapsulated into Completer to get the WebViewController value directly. So far, we have done this with FutureBuilder. However, in this case, this is unnecessary as we are not building other UI widgets in this method. So we can use another way to get the WebViewController value by using the Then method, which is the callback of the Future object and is called when the Future of that object is evaluated.
Then the whole method _showPageTitle looks like this:
JavascriptChannel
So, to send info about the page’s title, obtained by javascript, evaluated directly on the current page in Webview, we use JavascriptChannel.
For javascript communication, JavascriptChannel is used as the communication channel that sends messages using the JavascriptChannel.postMessage method. And these messages are then received by the callback method of JavascriptChannel onMessageReceived.
So we create a method to create JavascriptChannel and call it _createTopBarJsChannel.
The JavascriptChannel class has 2 attributes: name, onMessageReceived.
We set the name attribute to ‘TopBarJsChannel’ and this attribute represents the JavascriptChannel‘s name, which we then use to send messages to the evaluateJavascript WebViewController method.
The onMessageReceived attribute thus represents the callback method of JavascriptChannel, which returns a message sent from javascript.
The text value of this JavascriptMessage is called by the command: message.message.
In our case we want to put this name in the AppBar of our Scaffold widget. To do this, we call the setState method to recall the build method and set the _title variable to the new title obtained from the javascript command document.title. We’ll still edit this name according to our specific example, where document.title returns a very long name and all we need to do is substring it with a ‘-‘ dash.
Conclusion
And with this is our third part of this first series of Flutter Tutorials completed and of course you can find the complete source code on the githube.